I will now evaluate my project and see how I did and how everything turned out overall. From my props to my environment and characters.
I will start by saying that I didn't stick to my proposal when it came to my character. This was because I found the concept art and the profile and side view. Overall my character turned out well. Yet there are a lot of areas that I would do differently. Such as my poly count is far to high for a character at 80k. I would try to do it with different techniques that I know now. Such as baking out a basic diffuse, ambient occlusion maps and unwrap the whole model while keeping the poly count low.
While keeping the poly count low I would of used a normal map to keep the detail, and maybe input him into Z-brush to create a high poly sculpt of the character.
As you can see there is a lot that I could of done differently yet you learn form these mistakes and hopefully the next character I create will be a lot better.
Next I will talk about my environment. Overall I thought this turned out well, I stuck to my concept and kept it small and simple. I wanted to litter the scene, to make it look busy and interesting and I think I did this well. There are still things I would of done differently is build the scene seperately and unwrap more items to ensure that the scene is more detailed than just basic textures. I think the textures are the thing that lets the whole scene down because its not as detailed as it could be.
The jet itself is alright. I used Nurbs to model it, then converted it to a poly to ensure that it renders right. I then used basic box modelling technquies to ensure that it looks correct. I then textured it using basic blinns and lamberts. I also used ramps and grids to try and make the texture how I wanted. I then used lights to light the scene, using colours that I took from the environment that I used.
For my animation I wanted to make something different that an animated biped in Max, so I opted for the Maya version, and I found a fully rigged model on-line that I could use for this. I then proceeded to key frame animate this person into how I wanted, after creating a basic storyboard for him. I would do things differently now, by adding more to the animation and maybe doing more moves and flips within it. Making it more interesting to watch. I would add more camera work and even more cameras to ensure that it was interesting and thrilling to watch.
I also did a small dance animation based off a popular series "The Office", this one was a bit of fun and I used the basic technique that was used in the other animations. It turned out pretty good so I decided to render it and put it up on my blog.
Overall I think my project went well, and as with all projects there are things that I look back on now and think that I could do it differently, but I felt that everything I have achieved has made this project solid and successful.
Friday, 11 May 2012
Wednesday, 9 May 2012
Animation
For my animation I want to do something different to my other project. I just want to create animations that show off human movement when they are interacting in certain ways. From jumping and swinging to leaping over blocks. After taking some time to look at parkour videos all over Youtube, I was inspired to create something that matched these slightly, taking scenes out of them and studying them carefully.
Due to the fact that I have a new brief for this, I will also need to look at the ethical and legal constraints once more. One of the major ones I need to consider is copyright. I will need to make sure that I reference any materials I use, because if I don't then I can be sued for a lot of money. I also need to make sure I don't offend anyone with my animation, for example any swearing or rude gestures should be kept out of my animation.
I will keep my framerate the same on all of my animations, which will be a smooth 24 frames a second, this is because it will run smooth and look like my person is running right and not have any lag to him.
Here is the animation storyboard that I drew before I started animating, to ensure that I had some idea of what I wanted before I started.

Here is another animation that I have done using the same guy, and the same techniques as the previous one.
Here is the animation storyboard that I drew before I started animating, to ensure that I had some idea of what I wanted before I started.

The source for the download that I used to get this guy that was rigged is here : http://www.digitaltutors.com/11/training.php?pid=609&autoplay=1
Here is another animation based off a dance from the series "Office" I'll link you to my reference below, I didn't do the whole dance, just the starting bit.
Modelling : Environment
My environment was modelled on 3DS Max is has been a combination of different ideas that I have come up with, from my original steam punk idea, to a much newer and simpler idea of creating as run down, broken shack. It has a nice mix between the two.
It was created within 3DS Max and all of the props I modelled separately and pulled into the scene that I had created. Most of the texturing that was done was done by using the UV Mapping tool, which allows me to position the textures manually on an object to get it how I want.
The lighting used is done by the mental ray skylight, which uses photons and global illumination to get the effects that look good and detailed.
Here is the first rendered screenshot of one of the rooms:


As you can see from the screen-shots, they have changed quite a bit from the untextured one, to the textured on. The fully textured one is dark and gloomy which gives off the effect I wanted in the shack.
Here is another couple of screen-shots:

This is a big change from the other ones, because I then decided that I wanted to try and render with holes in the roof, thus allowing more light into the scene, it also gave this nice effect with the roof slats.
So I did the same with the bathroom, which is next door to this room.

As you can see, its still very dark in the corridor because that's covered up from the upper part of the house, I just wanted the roof to be missing here, and not on that side, because it gives the feeling that its been destroyed, not removed.

As you can see from the picture, I have kept everything dark, to keep with the theme of the building to ensure that the scene was not to dark, and it also adds to that sense of destruction.

Modelling : Jet
Here is the jet I modelled within Maya, this was one of the first things I attempted to model within Maya itself, Its just a basic poly / Nurb's mesh that I used. I got the inspiration for this, and most of the ideas from a picture and set of tutorials I found on the internet. Yet because the tutorials cost to watch, I could only look at the images for ideas, and try to model it from them.
The source is here : http://gfxdomain.com/blog/images/DTIM_2012.jpg
As you can see its good quality mesh, and I wanted to try and mimic it, but put my own spin on it slightly.
Here are the finished mesh pictures:

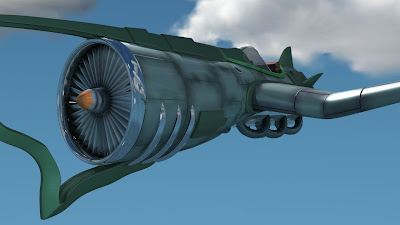


As you can see I stuck to the picture quite closely and modelled along to my reference, this wasn't a test of skill for me, it was a simple practise of whether I could work to a reference photo, and also get used to the Maya interface and tools, I feel I did pretty well, yet my work has grown since I created this.
The source is here : http://gfxdomain.com/blog/images/DTIM_2012.jpg
As you can see its good quality mesh, and I wanted to try and mimic it, but put my own spin on it slightly.
Here are the finished mesh pictures:


As you can see I stuck to the picture quite closely and modelled along to my reference, this wasn't a test of skill for me, it was a simple practise of whether I could work to a reference photo, and also get used to the Maya interface and tools, I feel I did pretty well, yet my work has grown since I created this.
Tuesday, 8 May 2012
Modelling : Character
Here are screen shots from my character that I have created. He was made within Maya, and is a high poly mesh. The techniques i have used all built up to create this mesh was basic polygon modelling techniques such as edge loops, extruding, moving vertex's around and mesh smoothing.
Here are the images that I found that I wanted to model from. I did not draw these, and simply found these images off google and thought they would be perfect for me to practise on, it turned out well so I decided to use it. Its most likely already been turned into a 3d model yet I wanted to take my own shot at it.
Here is the front and side view of the character:


After finding these images I then found the model that they were made into(Found an image on Google), and this became my inspiration for the piece, and how to set up my model, and pose him in a certain way. I feel that finding references to look at can help with the modelling process, except that this was primarily used once the mesh was finished, and used to render a good looking scene.
The source is : http://pic.gbstuff.com/items/CG-1674/1.jpg
From there I set up a scene using two planes, so I could use these images while I modelled as reference. I set the planes as their own layer and that was set to "reference" so I couldn't accidentally move them.
After that was set up I started modelling, I started with the chest and used the modelling menu to shape him correctly. Using the lattice animation deformer to shape his waist because its easier that moving vertex's around. After that was down I deleted a hole for his arm and legs and selected the edge loop around the whole and extruded them out to the wrists and the ankle then I added edge loops in to define the shape even more. After that was done I moved onto the hands and feet.
The hands were the hardest part but I just created one finger using a simple box, and added edge loops around the side and middle to shape it to fit the reference pictures, from there I copied it across 4 times, one for the thumb and 3 for fingers. Once they were shaped and placed correctly I used the vertex snap tool, and then vertex merge tool to ensure that it would smooth correctly, then I extruded the wrist across and used the same technique to connect up the thumb and fingers, and that was the hand complete.
After the hand was completed I moved onto the model the foot. All i did was extrude the ankle to the base of the foot to create the heel, then extrude the front out to create the rest of the foot. This doesn't need to be accurate because I will be modelling a shoe out of this, so I can leave it basic.
From there I started modelling the head. this was started with a basic poly cube, that was smoothed over with a basic smoothing group of 1. From there I proceeded to model the head, adding the chin and neck detail, and the basic horn shape. after that I added in more edge loops and pulling them in and out created muscles that would reinforce the shape of the neck and back of the head. I then used the scuplt geometry tool to move and relax vertex's around to ensure the muscles were not too strong in shape.
Once this was done the basic low poly mesh of the character was complete! I could of UV unwrapped him there, maybe taken him into Z-brush or Mudbox and detailed him further, but I wanted to create a high poly version of this mesh straight in Maya, so I started detailing him further.
From the basic mesh I started using the poly cut tool, which allows me to draw lines and vertex's straight onto the mesh, thus editing the topology of the mesh to my liking, to form things like muscles and bends in the skin. This is what I did until the whole body was looking realistic enough for me to be happy with.
From there I wanted to model the hood. I did this in the same way I started the mesh. with a half cylinder that I bend into shape and added extra detail to like vertex's and lines to ensure that it fit to his head. I added rips and wrinkles to his clothing by adding more topology and extruding out the bits I wanted, when smoothed this created a nice torn effect.
I then moved onto the tunic, in which I just copied some of the mesh from the hood down and curved it round his body, then I modelled the belt, which was just a cylinder flatten and shaped round his waist, and then extruded out to give it some depth.
From there the boot were simple to model. I just took the existing basic mesh of the foot I created earlier and then shaped it to how I wanted. Adding edge loops in where I wanted wrinkles to be and smoothed the whole thing over.
After that was done, the only thing I had to do was to model this bracer's this was done by created as simple poly cube and then added edge loops in so I could change the shape of the whole object. from there I deleted the middle. Then extruded the faces to give it some depth.
After this was completed the high poly mesh was done, the next job was to add textures, which was done using simple methods such as a coloured blinn for his skin, then add a leather texture for a bump map, but ensuring that the bump mapping property's were not to high, just to give the skin a little bit of texture.
The same was done for the leather equipment as well.
Here is the finished result:

Subscribe to:
Comments (Atom)